View.setOnClickListener 執行,點下去,成功了
View.setOnLongClickListener 執行,點下去不放,成功了
原本想說事件處理差不多就這個模式,要處理什麼動作就setOn某某Listener就好了
所以就繼續試setOnDragListener,想說應該拖曳就會觸發了,結果沒反應
所以就開始研究一下
一開始參考了Android Developer上的拖曳行為這篇
http://developer.android.com/intl/zh-tw/guide/topics/ui/drag-drop.html
覺得雖然講得很詳細,但太長,對於拖曳行為怎麼做完全沒概念的新手幫助好像不大
後來很幸運地找到了這篇
http://www.vogella.com/tutorials/AndroidDragAndDrop/article.html
看一下程式碼跟說明很快就懂了
所以這篇就有點心虛地用個幾乎一樣的例子來解說拖曳行為(誰叫他範例用得這麼恰當:))
首先,使用者的一個完整的拖曳行為可以分為4個階段
1.按住要拖曳的元件
由於大部分的使用者經驗都是經由按著不放後一下下才開始可以拖曳該元件,所以通常會將可拖曳的元件設定OnTouchListener或是OnLongClickListener
※OnClickListener不行,因為是放開後才會執行onClick
2.該元件開始可以拖曳
使用該元件(View)的starDrag方法告知系統開始拖曳這個元件
3.該元件被拖曳中(移動中)
在拖曳移動的過程中,系統會持續發送DragEvent給畫面中其他的View,所以有想要對拖曳行為產生反應的View就要設定OnDragListener
4.該元件被拖到某個位置放掉(使用者手離開觸控螢幕)
接下來就模仿實作看看
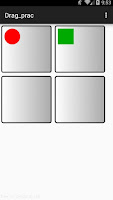
先上結果圖
功能就是可以把紅色圓形或綠色正方形在四個容器中拖曳移動,並且被拖曳到的容器會變藍框框
所以要準備的東西有:
1.紅圓型的drawable
<?xml version="1.0" encoding="utf-8"?>
<shape android:shape="oval" xmlns:android="http://schemas.android.com/apk/res/android">
<size android:width="50dp" android:height="50dp"/>
    <solid android:color="#ff0000" />
</shape>
2.綠正方形的drawable
<?xml version="1.0" encoding="utf-8"?>
<shape android:shape="rectangle" xmlns:android="http://schemas.android.com/apk/res/android">
 <solid android:color="#00aa00"/>
    <size android:height="50dp" android:width="50dp" />
</shape>
3.黑邊框容器
<?xml version="1.0" encoding="utf-8"?>
<shape android:shape="rectangle" xmlns:android="http://schemas.android.com/apk/res/android">
<corners android:radius="5dp" />
    <gradient
        android:angle="180"
        android:startColor="#aaaaaa"
        android:endColor="#ffffff"
        />
    <stroke android:color="#000000" android:width="3dp"  />
</shape>
4.藍邊框容器
<?xml version="1.0" encoding="utf-8"?>
<shape android:shape="rectangle" xmlns:android="http://schemas.android.com/apk/res/android">
    <corners android:radius="5dp" />
    <gradient
        android:angle="180"
        android:startColor="#aaaaaa"
        android:endColor="#ffffff"
        />
    <stroke android:color="#0000ff" android:width="3dp"  />
</shape>
5.activity_main.xml
<GridLayout
    xmlns:android="http://schemas.android.com/apk/res/android"
    xmlns:tools="http://schemas.android.com/tools"
    android:layout_width="match_parent"
    android:layout_height="match_parent"
    tools:context=".MainActivity"
    android:columnCount="2"
    android:rowCount="2">
    <LinearLayout
        android:id="@+id/ll_left_top"
        android:layout_height="150dp"
        android:layout_width="160dp"
        android:background="@drawable/container"
        android:layout_margin="5dp"
        android:orientation="horizontal"
        android:padding="10dp"
        >
        <ImageView
            android:layout_width="wrap_content"
            android:layout_height="wrap_content"
            android:id="@+id/imageView"
            android:src="@drawable/circle" />
    </LinearLayout>
    <LinearLayout
        android:id="@+id/ll_right_top"
        android:layout_height="150dp"
        android:layout_width="160dp"
        android:background="@drawable/container"
        android:layout_margin="5dp"
        android:orientation="horizontal"
        android:padding="10dp"
        >
        <ImageView
            android:layout_width="wrap_content"
            android:layout_height="wrap_content"
            android:id="@+id/imageView2"
            android:src="@drawable/rectangle" />
    </LinearLayout>
    <LinearLayout
        android:id="@+id/ll_left_btn"
        android:layout_height="150dp"
        android:layout_width="160dp"
        android:background="@drawable/container"
        android:layout_margin="5dp"
        android:orientation="horizontal"
        android:padding="10dp"
        >
    </LinearLayout>
    <LinearLayout
        android:id="@+id/ll_right_btn"
        android:layout_height="150dp"
        android:layout_width="160dp"
        android:background="@drawable/container"
        android:layout_margin="5dp"
        android:orientation="horizontal"
        android:padding="10dp"
        >
    </LinearLayout>
</GridLayout>
6.MainActivity
    @Override
    protected void onCreate(Bundle savedInstanceState) {
        super.onCreate(savedInstanceState);
        setContentView(R.layout.activity_main);
        findViewById(R.id.imageView).setOnLongClickListener(new MyLongClickListener());
        findViewById(R.id.imageView2).setOnLongClickListener(new MyLongClickListener());
        findViewById(R.id.ll_left_btn).setOnDragListener(new MyDragListener());
        findViewById(R.id.ll_left_top).setOnDragListener(new MyDragListener());
        findViewById(R.id.ll_right_top).setOnDragListener(new MyDragListener());
        findViewById(R.id.ll_right_btn).setOnDragListener(new MyDragListener());
        }
2個ImageView是要被拖的,所以設定OnLongClickListener,長按後啟動拖曳功能。如果想要短按就啟動拖曳,可以改成onTouchListener
4個容器是要被放的,所以設定OnDragLIstener,在整個ImageView被拖曳的過程中會收到系統發送的DragEvent
class MyLongClickListener implements View.OnLongClickListener{
        @Override
        public boolean onLongClick(View v) {
            View.DragShadowBuilder shadowBuilder = new View.DragShadowBuilder(v);
            v.startDrag(null, shadowBuilder, v, 0);
            v.setVisibility(View.INVISIBLE);
            return true;
        }
    }
View有個startDrag(ClipData data, DragShadowBuilder shadowBuilder, Object myLocalState, int flags)方法
用來開始拖曳該View
首先第一個參數ClipData是拖曳時想夾帶給被放的View的資料,不過這個範例沒什麼資料要傳,所以填null
DragShadowBuilder是指拖曳時的顯示的陰影圖形,就像上面的第二張圖,紅色圓形被移動時那樣,會有點透明,Android叫他陰影。
生成的方法就用DragShadowBuilder的建構子,傳入一個view,就會生成這個view當作拖曳時的陰影,所以當然是傳入被拖曳的物件的view。
不然被拖曳的是一個view,拖曳時陰影卻是別的view看起來也不合理
第三個參數是個Object,用來傳遞被拖曳的元件的狀態,之後可以在系統發送的DragEvent中用getLocalState()取出。
所以這邊就傳入被拖曳的這個view,以便之後取出進行別的操作。
flag是旗標,官方文件說設0,我也懶得研究,就填0吧
最後用setVisibility,把被拖曳的View弄消失,這樣開始拖曳陰影出現的時候他就會不見,看起來才合理
    class MyDragListener implements View.OnDragListener{

        @Override
        public boolean onDrag(View v, DragEvent event) {

            switch (event.getAction()) {
                case DragEvent.ACTION_DRAG_ENTERED:
                    v.setBackground(getResources().getDrawable(R.drawable.container_dropped));
                    break;
                case DragEvent.ACTION_DRAG_EXITED:
                    v.setBackground(getResources().getDrawable(R.drawable.container));
                    break;
                case DragEvent.ACTION_DROP:
                    View a = (View)event.getLocalState();
                    ViewGroup parent = (ViewGroup)a.getParent();
                    parent.removeView(a);
                    LinearLayout ll = (LinearLayout)v;
                    ll.addView(a);
                    a.setVisibility(View.VISIBLE);
                    break;
                case DragEvent.ACTION_DRAG_ENDED:
                    v.setBackground(getResources().getDrawable(R.drawable.container));
            }
            return true;
        }
    }
onDragListener的部分首先當然就是實作onDrag
參數View v是指被放的那個View,也就是setOnDragListener的那個View,不是被拖曳的那個
參數DragEvent是系統發送的,可以從當中取得所有跟這整個拖曳過程有關的訊息
比如當被拖曳的view移到某個被放的view裡面,getAction就會得到ACTION_DRAG_ENTERED
移動離開某個被放的view,就會得到ACTION_DRAG_EXITED,其他行為以此類推
所以實作的邏輯也很簡單
被離開的view就把背景換成黑邊框容器的Drawable,container.xml
被進入的view就換藍邊框容器container_dropped.xml
而最後真正被放進(使用者手離開螢幕)的容器的邏輯
就要把被拖曳的view從原本的容器中移除,再加入被放進的容器中
DragEvent.getLocalState取得剛剛startDrag傳來的被拖曳的那個view
getParent取得原本的容器,再用removeView移除被拖曳的view
被移進的容器再把被拖曳的view加進來
被拖曳的view再setVisibility回可見狀態
ACTION_DRAG_ENDED是指整個拖曳過程結束


沒有留言:
張貼留言